How to convert HEIC to JPEG on Mac
To convert an HEIC image to JPEG on Mac, open the image in Montane, choose Save As, select JPEG, check the quality and saved image preview, and save a new copy. Changing the filename from .heic to .jpg does not convert the image data.
This guide uses Montane, a free image editor for Mac on macOS 14 or later. The conversion happens locally on your Mac, so you can work without uploading your photo to a conversion website.
When a JPEG copy is useful
HEIC is a common format for photos from Apple devices. Keeping the original is sensible, especially if it is part of your photo library. A JPEG copy is useful when an upload form, older application, or recipient specifically asks for JPG or JPEG.
JPG and JPEG refer to the same image format. The shorter extension does not mean a different quality level. What changes the result is the encoder’s quality setting and the content of the image.
Conversion is also different from resizing. You can make a JPEG with the same pixel dimensions as the source. If a website asks for both a JPEG and a maximum width, follow the image resizing guide before exporting.
Convert an HEIC image in Montane
- Open the original. In Montane, choose File → Open, select your HEIC file, and wait for it to appear. Check that it is the photo you intend to share.
- Make any final edits. Crop or resize only if the destination needs it. If you simply need a compatible format, leave the dimensions alone.
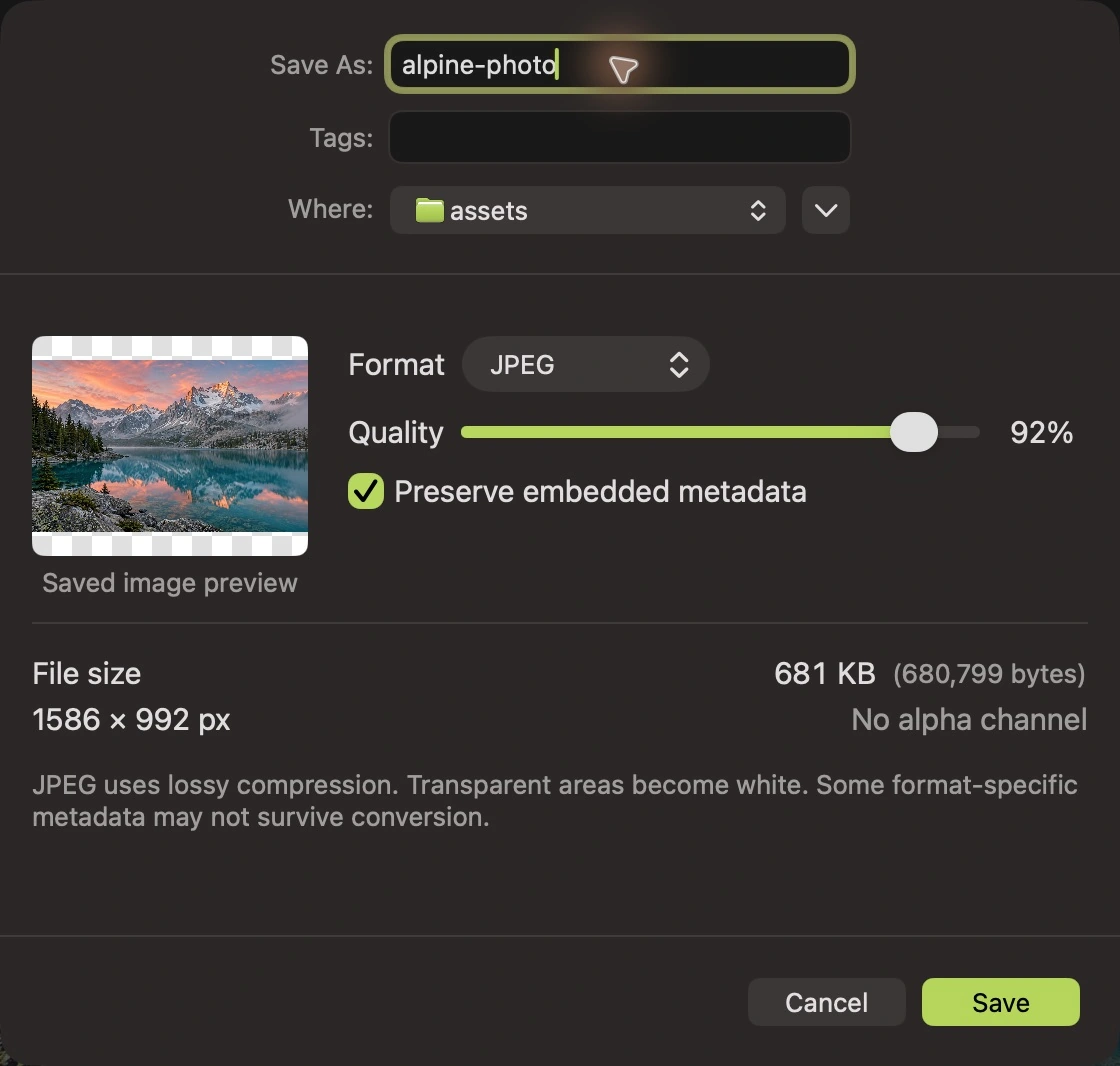
- Choose Save As. Click Save As in the toolbar or use Shift–Command–S. Give the copy a clear name and select a destination folder.
- Select JPEG. In the Format menu, choose JPEG. Montane shows the encoded preview, output dimensions, and exact byte count for the selected settings.
- Choose a quality level. Start toward the higher end of the slider, then lower it if file size matters. Let the preview update after changing the setting.
- Review metadata. Leave Preserve embedded metadata selected if you want supported embedded information carried across. Turn it off for a copy that should omit embedded metadata. Format-specific information may not survive conversion even when preservation is enabled.
- Save and check the copy. Click Save, then reopen the exported JPEG. Confirm that the photo looks right and that the destination accepts it. Keep the HEIC original for later edits.
Choose quality for the destination
JPEG uses lossy compression. Lower quality can reduce file size, but it can also soften texture, create blocks, or leave artifacts around sharp edges. A high setting does not make conversion lossless, and there is no single percentage that works for every photo.
For a family photo sent by email, a modest reduction may be acceptable. For a photograph with fine branches, hair, or detailed architecture, look more closely before choosing a smaller result. If the upload has a strict size limit, use the JPEG file-size guide to compare settings against that limit.
Avoid repeatedly opening and saving the JPEG as you try different settings. Return to the HEIC original and create a fresh output copy instead. Repeated lossy encoding can introduce additional changes.
What may change during conversion
JPEG does not keep an alpha channel. If the source has transparent areas, Montane fills those areas with white in the JPEG. For an image that needs transparency, choose a suitable format such as PNG or review the WebP conversion guide.
Montane exports a still image. It does not preserve motion, multiple frames, or an entire Live Photo experience inside the JPEG. Color appearance can also depend on the receiving app’s display and color handling, so inspect the copy where you plan to use it when that matters.
Common questions
Can I convert several HEIC photos at once?
Yes. Use File → Batch Convert to select several files and choose JPEG as the shared output format. The batch conversion guide covers destination folders, optional resizing, and checking individual results.
Why is my JPEG larger than the HEIC original?
Different formats compress differently. A high-quality JPEG can be larger than an efficiently encoded HEIC photo. Compare the actual output size rather than assuming that conversion always makes a file smaller.
Does the conversion need an internet connection?
Opening, editing, and converting images in Montane work locally after installation. An internet connection is needed to download the app from the App Store.
For the app’s editing and export features, visit the Montane home page. To continue with another task, browse all guides.