How to add text to an image on Mac
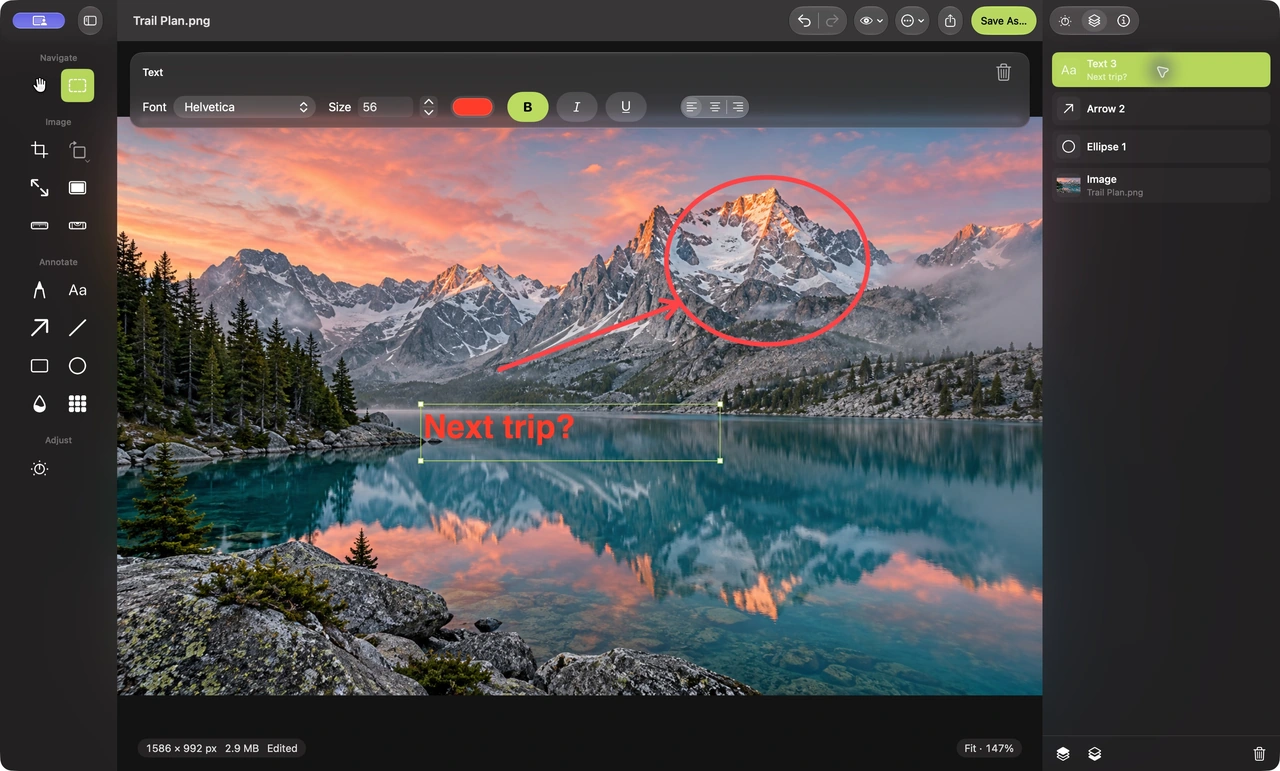
To add text to an image on Mac, open it in Montane, select Text, click where the caption should go, and type. Choose the font, size, color, and alignment in the text controls, then position the object and save a new copy.
This guide uses Montane’s free Mac image editor on macOS 14 or later. It covers captions and titles on pictures. For feedback that combines labels with arrows and shapes, follow the screenshot annotation guide.

Write the caption before styling it
A short, specific caption is easier to place and read. Decide whether the text names the subject, explains a detail, or provides a title. “Next trip?” over a travel photo has a different job from a long instruction on a screenshot.
Think about the final display size. A caption that looks generous on your Mac’s large window can become tiny in a card, message, or mobile page. Choose a length that works at that smaller size, and save longer explanations for the surrounding page text.
If the image will be cropped, settle the composition first using the crop guide. That avoids designing a caption around an area you later remove. If you need empty space beside the photo, Canvas Size can add surrounding area; Resize Image scales the picture itself.
Add and format text in Montane
- Open the image. Choose File → Open and check the composition. Keep a source copy without text for future use.
- Choose Text. Click the Text tool in the left rail, then click the image where you want to start the caption.
- Type your words. Enter the caption. Press Return for a new line. Finish editing with Command–Return or Escape.
- Choose a font and size. Use the contextual text controls. Pick a simple font that suits the image and a size that remains readable in the final layout.
- Set color and emphasis. Choose the text color and use bold, italic, or underline where they support the message. A short title rarely needs all three.
- Choose alignment and placement. Set left, center, or right alignment as appropriate. Select the text object to move or resize its box, then review line breaks and spacing.
- Save and reopen the output. Use Save As and choose a format suitable for the destination. Check the exported image at the size people will actually see.
Place text where it can breathe
Look for an area with relatively even color or texture. Sky, a plain wall, or uncluttered space often gives a caption more room than a busy face, product detail, or tree canopy. Avoid covering the part of the image people came to see.
Contrast matters more than a fashionable color choice. Light text can disappear in a bright sky; dark text can vanish over shadows. Move the caption to a clearer area, choose a more distinct color, or place it over a suitable simple shape when the composition allows it.
Leave space around the edges. Text that almost touches a boundary can look cramped, and a receiving layout may crop or round the image’s corners. Review the actual destination rather than assuming every platform displays the entire image identically.
Keep typography consistent
For a simple caption, one font and one clear size are often enough. If you need a title and a smaller supporting line, give them a deliberate hierarchy rather than adding several unrelated styles. Use line breaks to create a balanced block and check that the words still read in the intended order.
The text box’s width influences wrapping. After resizing or repositioning the box, inspect the lines again. A short final word left on a line by itself can make a caption feel awkward even when the font is attractive.
You can double-click an existing text object to edit the wording while the image remains open. Montane also provides one-pixel arrow-key nudging, ten-pixel nudging with Shift–arrow, and object ordering for overlaps. These are useful finishing controls when the initial placement is close but not quite right.
Common questions
Can I change the caption after saving?
While the original editing session remains open, the text object stays editable. A saved standard image reopens with the text flattened into the pixels. Keep the uncaptioned source, and finish revisions before closing the session if you want to retain the current text object.
Why does the text look soft after export?
Lossy compression or a very small output can soften sharp letters. Compare a PNG export with the result you are using, and review any WebP quality setting carefully. Use the resize guide to choose suitable dimensions without unnecessary enlargement.
Can I add several captions?
Yes. Add separate text objects when you need independent placement or styling. Use the editable objects inspector to select them and manage overlaps. Keep the layout simple enough that the photo and its message remain clear.
Explore Montane for more native Mac image tools, or choose another task from all guides.